顯示具有 linux 標籤的文章。 顯示所有文章

2023-09-18

Ubuntu/Linux Mint在 Macbook 13" 2014 的無線網卡/麥克風/風扇/攝影機設定

0.無線網卡:
因為broadcom的網卡driver不是開源而是專有的,所以用以下指令自動安裝(如nvidia driver也是):
sudo ubuntu-drivers autoinstall

1.修正line-in麥克風:
找到 mbp 2014 13"的機型識別碼:MacBookPro11,1

再找到 driver 為 Cirrus Logic CS4208 = mbp11

修改  /etc/modprobe.d/alsa-base.conf ,新增:
options snd-hda-intel model=mbp11

2.修正風扇不正常問題:
sudo apt install mbpfan
sudo systemctl status mbpfan

避免風扇時不時狂轉,修改/etc/mbpfan.conf:
min_fan1_speed = 2000
max_fan1_speed = 3500
...
polling_interval = 5

3.修正facetime webcam:

如果是iSight鏡頭(通常是2005~2010的macbook,如果不是請略過):
下載文章附件的AppleUSBVideoSupport,解壓縮:
https://www.linux.org/threads/installing-linux-on-an-imac.26009/
sudo apt install isight-firmware-tools
指向剛剛的AppleUSBVideoSupport檔案

安裝facetime camera firmware:
sudo apt install curl xzcat cpio git
git clone https://github.com/patjak/facetimehd-firmware.git
cd facetimehd-firmware
make
sudo make install

安裝facetime camera driver:
git clone https://github.com/patjak/bcwc_pcie.git
apt install debhelper dkms
mkdir /usr/src/facetimehd-0.1
cd bcwc_pcie
cp -r * /usr/src/facetimehd-0.1/
cd /usr/src/facetimehd-0.1/
make clean
dkms add -m facetimehd -v 0.1
dkms build -m facetimehd -v 0.1
dkms mkdsc -m facetimehd -v 0.1 --source-only
dkms mkdeb -m facetimehd -v 0.1 --source-only
cp /var/lib/dkms/facetimehd/0.1/deb/facetimehd-dkms_0.1_all.deb /root/
rm -r /var/lib/dkms/facetimehd/
dpkg -i /root/facetimehd-dkms_0.1_all.deb

ref:
https://askubuntu.com/questions/1430547/webcam-not-working-in-ubuntu-22-04-on-macbook-air
https://github.com/patjak/facetimehd/wiki/Installation#get-started-on-debian
https://github.com/linux-on-mac
https://support.apple.com/zh-tw/HT201300
https://askubuntu.com/questions/984239/no-microphone-picked-up-on-ubuntu-16-04-on-macbook-pro
https://www.kernel.org/doc/html/latest/sound/hd-audio/models.html
2023-02-12

RK987在Linux/Ubuntu下模擬成Apple鍵盤造成Function keys不正常的問題

 二年多前在淘寶買的RK987藍芽雙模鍵盤,在Linux/Ubuntu下的F1-F12總是會模擬成多媒體鍵(不管有無加上Fn),用lsusb指令查看,發現這鍵盤的vid:pid是05ac:024f,名稱是Apple Keyboard,才發現這鍵盤把自已假裝成Apple鍵盤了,這導致Linux會自動載入hid_apple驅動,但這鍵盤的F1-F12卻又無法正常使用。

解法是修改Fn的預設行為:

echo "options hid_apple fnmode=2" | sudo tee -a /etc/modprobe.d/hid_apple.conf 
sudo update-initramfs -u <for Ubntu/Debain>
sudo mkinitcpio -P <for Arch>

並將鍵盤模式用Fn+A切換成WIN模式。

下面解釋了Fn設為0,1,2的不同:

  1. 0 = disabled : Disable the 'fn' key. Pressing 'fn'+'F8' will behave like you only press 'F8'
  2. 1 = fkeyslast : Function keys are used as last key. Pressing 'F8' key will act as a special key. Pressing 'fn'+'F8' will behave like a F8.
  3. 2 = fkeysfirst : Function keys are used as first key. Pressing 'F8' key will behave like a F8. Pressing 'fn'+'F8' will act as special key (play/pause).

ref:
https://unix.stackexchange.com/questions/604791/keyboard-function-keys-always-trigger-media-shortcuts-regardless-of-whether-fn
https://unix.stackexchange.com/questions/121395/on-an-apple-keyboard-under-linux-how-do-i-make-the-function-keys-work-without-t
https://unix.stackexchange.com/a/672672

2023-01-04

Linux Lutris 安裝 Battle.net 及 World of Warcraft (WOW)

安裝過程中遇到了一些雷,把解決過程順便紀錄下來。
  1. 從lutris按左上的+號,找尋lutris上的遊戲,找battle.net並安裝,安裝時可參考https://github.com/lutris/docs/blob/master/Battle.Net.md
    https://github.com/lutris/docs/blob/master/InstallingDrivers.md

  2. 因預設用的wine版本是lutris-7.2-2-x86_64,啟動battle.net介面時會直接噴錯,中間有改用wine 8.0 staging試,可以進battle.net安裝WOW,但會一直卡更新(初始化 2145571...)

  3. 安裝ProtonUp-Qt,幫lutris安裝GE的proton7-35版本,並在lutris設定battle.net的wine版本為此版本,順便設定啟用DPI縮放

  4. 此時開啟battle.net應可正常登入並下載WOW,在battle.net設定把限制下載頻寬關閉。若仍無法正常下載或更新,請繼續以下步驟

  5. 設定battle.net的winetricks,安裝vcrun2015及corefonts

  6. 開linux terminal並進安裝battle.net的資料夾(假設放在/home/<user>/Games/battlenet/),找到
    /home/<user>/Games/battlenet/drive_c/Program Files (x86)/Battle.net
    /home/<user>/Games/battlenet/drive_c/ProgramData/Battle.net
    這二個資料夾,分別在這二個資料夾下執行:
    find -exec setfattr -x user.DOSATTRIB {} \;

    並再到/home/<user>/Games/battlenet/drive_c/Program Files (x86)/Battle.net/Battle.net.13894執行:
    setfattr -x user.DOSATTRIB platforms/qwindows.dll

  7. 有些比較舊的顯卡(我有在一台只有內顯Intel HD Graphics 520的筆電試裝),VULKAN的支援度可能沒那麼好,若遊戲無法執行或噴錯,可以試著分別關閉VXDK或VXD3D試試,用的是intel i915系列driver的話(如上述顯卡)再執行:
    sudo sysctl dev.i915.perf_stream_paranoid=0

  8. 另外開啟lutris的log會發現一直無法載入32bit的gamemode library,可參考以下解法:
    https://github.com/FeralInteractive/gamemode/issues/254#issuecomment-643648779

ref:
https://www.linuxuprising.com/2021/11/easily-install-and-manage-custom-wine.html
https://appdb.winehq.org/objectManager.php?sClass=version&iId=28855
https://us.forums.blizzard.com/en/blizzard/t/last-update-completely-breaks-wine-compatibility/33122
https://lutris.net/games/battlenet/
https://github.com/lutris/docs/blob/master/Battle.Net.md
https://github.com/lutris/docs/blob/master/InstallingDrivers.md
https://www.reddit.com/r/wow/comments/zfrkpd/stuck_initializing_2145571/
https://github.com/FeralInteractive/gamemode/issues/254

2022-04-16

ubuntu/mint下chromium啟用硬體加速+解決netflix無法觀看

在ubuntu/mint下要啟用chromium的硬體加速,必須是pathced過的版本,

可以用 https://launchpad.net/~saiarcot895/+archive/ubuntu/chromium-beta 
(包含Widevine,觀看netflix等有DRM保護的串流時需要)

或 https://github.com/Eloston/ungoogled-chromium#downloads 
(不包含Widevine)

先裝好對應各顯卡的VA-API driver,啟動chromium時加上以下參數:

chromium-browser --use-gl=desktop --enable-features=VaapiVideoDecoder --disable-features=UseChromeOSDirectVideoDecoder
(chromium 98開始需加上 --disable-features=UseChromeOSDirectVideoDecoder)

====2024.09更新(在128的版本實測有效):==========

https://ubuntuhandbook.org/index.php/2024/01/chromium-va-api-wayland/
https://debugpointnews.com/va-api-chromium-wayland/

chromium 121以後的版本,可以不用再找有va-api patched過的版本,直接使用以下參數開啟硬體加速:

On X11:
chromium-browser --enable-features=VaapiVideoDecodeLinuxGL --use-gl=angle --use-angle=gl --ozone-platform=x11

On Wayland:
chromium-browser --enable-features=VaapiVideoDecodeLinuxGL --use-gl=angle --use-angle=gl --ozone-platform=wayland

=====================================

用ungoogled-chromium又想加上Widevine DRM支援時,
可先下載對應版本的Chrome DEB安裝檔(stable, unstable),
解開後,把 ./opt/google/chrome/WidevineCdm 複製到
 /usr/lib/chromium/WidevineCd 或 ~/.local/lib/WidevineCdm

ref:
https://wiki.archlinux.org/title/Chromium#Hardware_video_acceleration
https://www.linuxuprising.com/2018/08/how-to-enable-hardware-accelerated.html
https://ungoogled-software.github.io/ungoogled-chromium-wiki/faq#linux

2021-08-29

Linux Mint的登入視窗(greeter)方向錯誤 & grub解析度(resolution)錯誤

 最近升級了辦公室電腦,把系統移到新電腦後,發現登入視窗的螢幕方向是左旋90度的(但登入後就變正常了),由於一直是使用雙螢幕但之前是沒這個問題的,即使重新設定設定中的「登入視窗」指定螢幕也是沒有用,於是只好直接修改/etc/lightdm/lightdm.conf,加入:

[Seat:*]
display-setup-script=xrandr -o right

強迫再右旋回來。

2022/02/22 updated:
原因是換了GTX 1660顯示卡後,/etc/X11/xorg.conf並末重新產生,導致還是舊的GT 710的設定,
可利用nvidia-xconfig或nvidia-settings重新產生xorg.conf:
https://wiki.archlinux.org/title/NVIDIA#Xorg_configuration

用nvidia-settings的話,點左邊X server Display Configuration,再點右下的Save to X Configuration File,但若是無法成功寫入的話,那麼就自行複製Preview的內容貼到xorg.conf。

GRUB的登入解析度也是變成640x480,因無法先載入nvidia驅動的關係,修改 /etc/default/grub,加入:

GRUB_GFXMODE=1024x768
GRUB_GFXPAYLOAD_LINUX=keep

再存檔執行 sudo update-grub 重開機。
(先執行sudo hwinfo --framebuffer或進grub執行videoinfo確定支援的framebuffer有哪些)

ref:
https://askubuntu.com/questions/408302/rotated-monitor-login-screen-needs-rotation
https://www.binarytides.com/ubuntu-fix-nvidia-graphics/
https://askubuntu.com/questions/54067/how-to-safely-change-grub2-screen-resolution
https://askubuntu.com/questions/217758/how-to-make-an-xorg-conf-file
https://zhuanlan.zhihu.com/p/33983810

2021-03-04

netbeans在ubuntu上不斷要求開啟GNOME Keyring或KWallet 解決方法

 根據官方說明,這是netbeans用來記憶ftp, git, svn...等密碼的方法,就如同 window的login-based encryption、Mac OS X的Keychain、Linux的GNOME Keyring或KWallet。

解法一:安裝kwalletmanager或 libgnome-keyring-dev(擇一),並輸入你的使用者密碼讓netbneas有keyring或kwallet的存取權,以後就不會再來煩你了。

解法二:在netbeans.conf的netbeans_default_options加入:
-J-Dnetbeans.keyring.no.master=true
這樣以後密碼會存放在記憶體,但netbeans關掉就密碼就會消失了。

ref:

http://wiki.netbeans.org/FaqMasterPasswordDialog
https://wiki.archlinux.org/index.php/Netbeans#Integrate_Netbeans_with_kwallet
https://stackoverflow.com/questions/8666670/how-to-make-the-netbeans-doesnt-ask-for-the-master-password
https://superuser.com/questions/416976/why-does-netbeans-ask-for-master-password-at-the-begining

2020-11-02

Ubuntu 18 + Nvidia 顯卡螢幕撕裂(screen tearing)問題

什麼叫screen tearing:


解決方法:

  1. 安裝nvidia-settings
    sudo apt-get install nvidia-settings

  2. 打開NVIDIA X Server Settings後,選擇左邊X Server Display Configuration/Advanced...,把Force Composition Pipeline或Force Full Composition Pipeline個別其中一個打勾試試

  3. 記得按Save to X Configuration File儲存設定到 /etc/X11/xorg.conf

  4. 選擇左邊nvidia-settings Configuration,按右邊Save Current Configuration儲存設定到 ~/.nvidia-settings-rc

如果是像在瀏覽器chrome上看影片的話,瀏覽器的硬體加速選項可能也要調整:
https://www.lifewire.com/hardware-acceleration-in-chrome-4125122


ref:
https://askubuntu.com/questions/1170247/how-do-i-solve-screen-tearing-on-ubuntu-18-04-with-nvidia

2019-07-18

Arch Linux 安裝在VirtualBox後,安裝Guest Additions

將Arch Linux安裝在VirutalBox(GUEST端)跟一般安裝一樣沒啥特別,不過安裝Guest Additions時會比較麻煩一點:

1.在VBox選單選擇「Devices/Insert Guest Additions CD Image...」

2.安裝build kernel必要的package:
#sudo pacman -S gcc make perl

3.找出kernel版本,再安裝headers:
#uname -r
<4.19.59-1-MANJARO>

#sudo pacman -Si linux419-headers
版本: 4.19.59-1

#sudo pacmam -S linux419-headers

4.安裝guest additions
cd /run/media/username/VBox_GAs_6.0.10/
sudo sh VBoxLinuxAdditions.run

5.重開機,可以調整解析度囉!別忘了還要在HOST端安裝Extension Pack,才能支援USB 2.0 and USB 3.0 devices, VirtualBox RDP, disk encryption, NVMe and PXE boot for Intel cards…等功能

6.以後要是有升級kernel,記得要
rcvboxadd quicksetup <version>
或直接
rcvboxadd quicksetup all
重建module

ref:
https://wiki.archlinux.org/index.php/VirtualBox#Installation_steps_for_Arch_Linux_guests
https://www.virtualbox.org/wiki/Downloads

2019-07-11

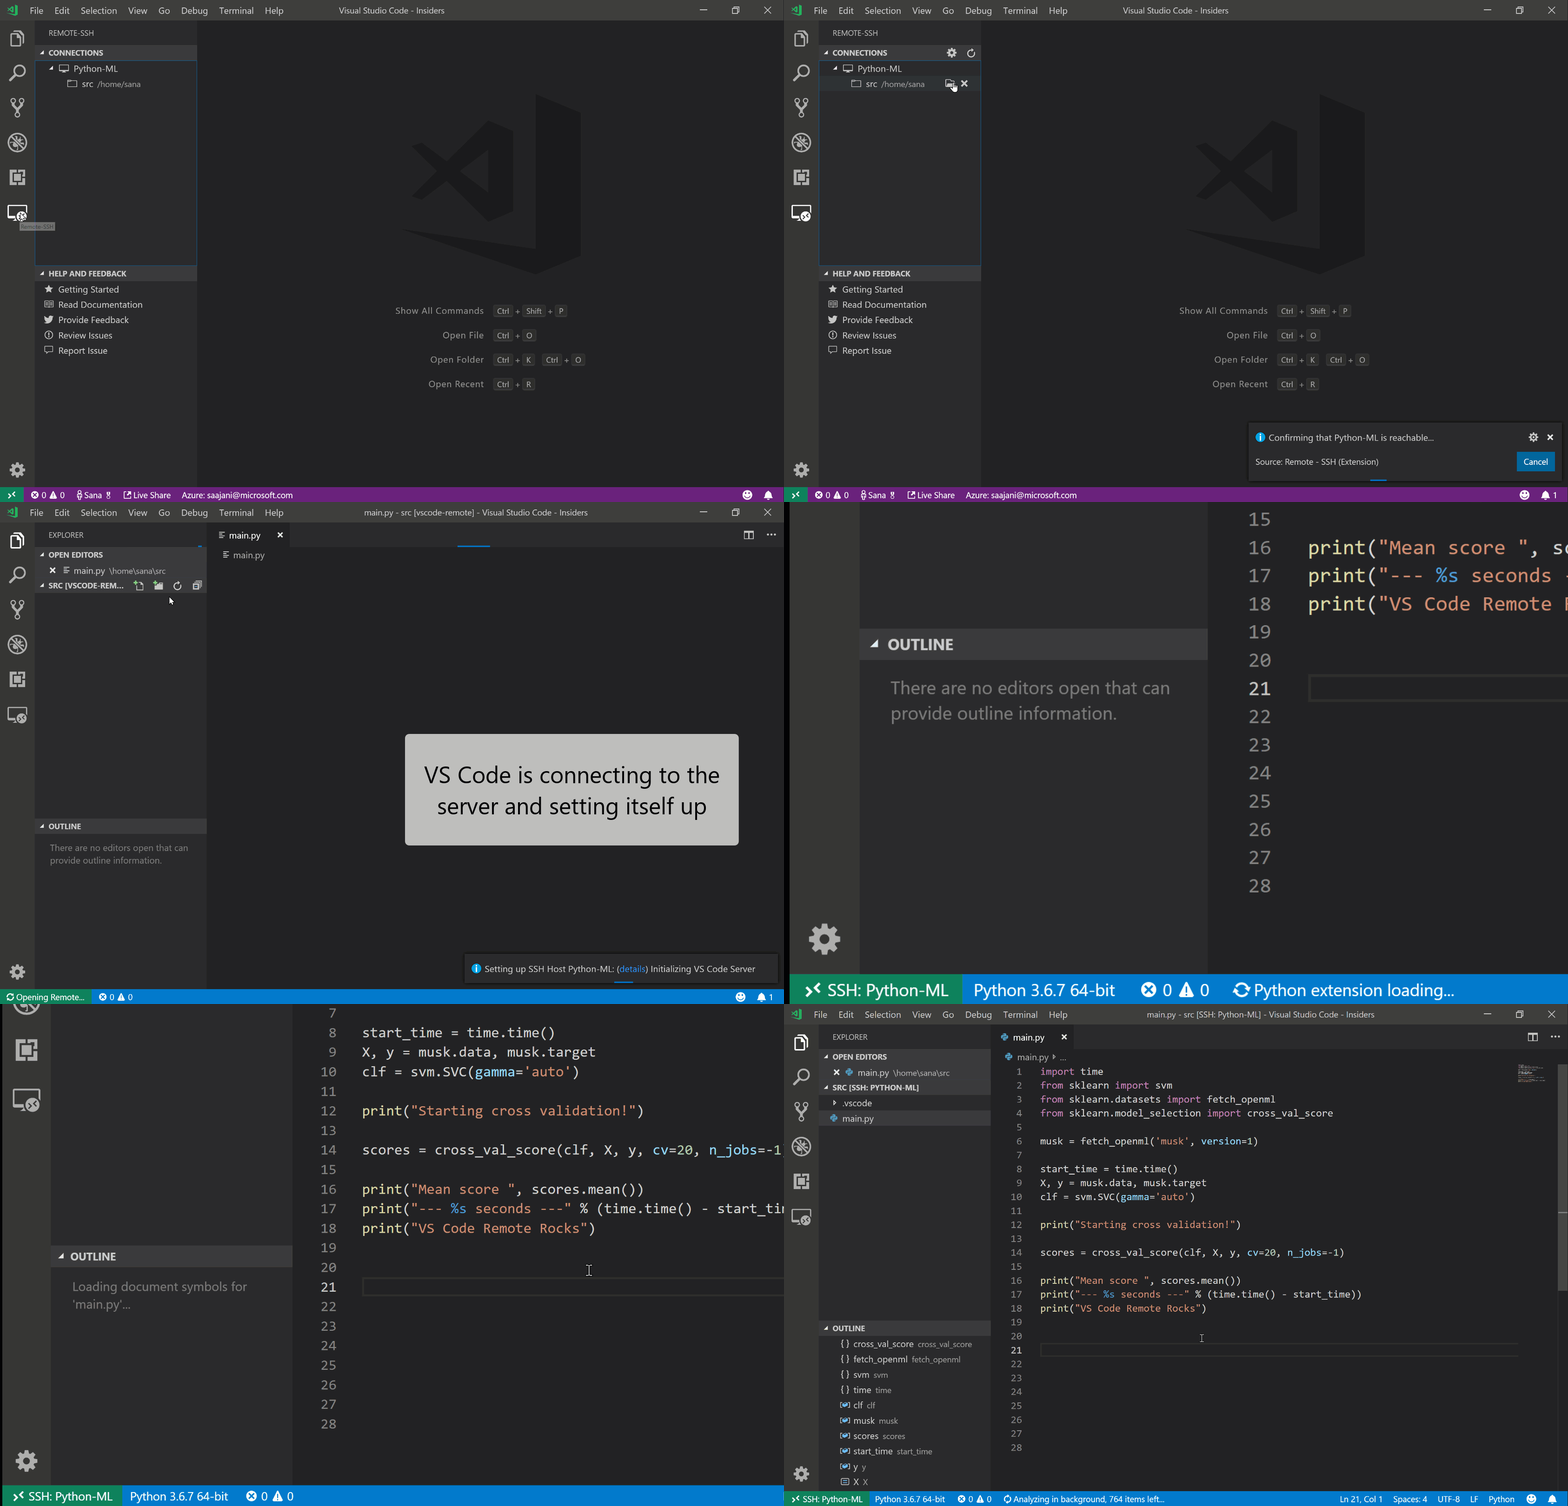
Visual Studio Code使用Remote-SSH套件遠端作業

由於常常需要ssh連到server修改檔案,之前是使用VSCode的remote workspace套件:
https://marketplace.visualstudio.com/items?itemName=mkloubert.vscode-remote-workspace

後來微軟又出了個Remote Development套件,裡面包含了:

  • Remote - SSH - Work with source code in any location by opening folders on a remote machine/VM using SSH. Supports connecting to x86_64 Linux SSH servers now, and more platforms are on the way.
  • Remote - Containers - Work with a sandboxed toolchain or container based application by opening any folder inside (or mounted into) a container.
  • Remote - WSL - Get a Linux-powered development experience from the comfort of Windows by opening any folder in the Windows Subsystem for Linux.
如果只有SSH遠端作業的需求,只要單獨安裝Remote - SSH即可:

目前該套件能正常連線遠端server有以下作業系統:
Full support: x86_64 Debian 8+, Ubuntu 16.04+, CentOS / RHEL 7+.
Experimental support: ARMv7l Raspbian 8+ (32-bit) in Visual Studio Code Insiders only.

果然我找了台CentOS 6就無法連線成功了...但其實如果你堅持要能在版本比較舊的server端使用,可以參照以下說明,在server端安裝缺少的一些library:
https://code.visualstudio.com/docs/remote/linux#_tips-by-linux-distribution

像CentOS 6可以照以下方法讓Remote-SSH套件能使用,安裝完重開機即可(注意,因為是升級library,可能會造成server某些服務不正常,如果是跑重要服務的server要升級library前請三思):
https://code.visualstudio.com/docs/remote/linux#_updating-glibc-and-libstdc-on-rhel-centos-6

不過遠端server要先做一些設定,修改 /etc/ssh/sshd_config,將 AllowTcpForwarding設定為yes,然後記得restart ssh demon:
sudo systemctl restart sshd

sudo service sshd restart
這樣本機端才能對server端建立 SSH tunnel,因為Remote - SSH必須靠建立tunnel才能使用(有點雷...)。

還有幾個設定比較需要注意的:

"remote.SSH.useLocalServer": true/false -> 讓vscode視窗共用單一連線,這會讓開啟vscode更快且不用一直輸入密碼,但有時候會造成無法正常連線(譬如timeout),此時設為false試試。一般來說我是設為false,但有些人須設為true才會沒問題。

"remote.SSH.listenOnSocket":true/false -> 如果remote server上有很多使用者的話(MacOS/Linux),那麼讓遠端的vscode server改用socket模式監聽,這樣可以增加安全性,同時sshd的AllowStreamLocalForwarding設定也要設為yes,這樣才能把tcp給forward到socket上。

接下來就是安裝Remote - SSH套件,連線ssh的方式較常見有key based authentication,或輸入password的方式、還有就是同時key+password,個人是習慣每次連線只輸入密碼,
至於網路一些教學說只能用key的方式,我覺得這些人也是東抄西抄不求甚解,這套件是基於ssh使用的,當然是可以直接輸入密碼認證。

先修改本機 ~/.ssh/config 檔案,加入以下設定:
Host server1
    HostName server1.com.tw
    User username

Host server2
    HostName server2.com.tw
    User username

#避免要多次輸入密碼,加入以下ControlMaster設定
Host *
    ControlMaster auto
    ControlPath  ~/.ssh/sockets/%r@%h-%p
    ControlPersist  24h

#防止timeout,每120秒就向server發送keep-alive封包,超過60次無回應斷線
ServerAliveInterval 120
ServerAliveCountMax 60


建立 ~/.ssh/sockets 資料夾:
mkdir -p ~/.ssh/sockets

之後就可以開始連線了,連線過程中會出現prompt要你輸入密碼,完成。


2019-07-09

Linux MInt 19 (Ubuntu 18.04)安裝Mednafen

Mednafen是另一套支援多種遊戲機的模擬器,當然在RetroArch也已包含Mednafen的遊戲核心(beetle開頭的都是),所以一般來說安裝RetroArch就不需要安裝Mednafen了,除非是習慣使用Mednafen,隨君喜好。

還有一套叫higan,但因此作者的設計理念是「精準模擬」,所以跑起來影像或聲音很可能會有卡頓的情形,不建議拿來玩遊戲,但要學習如何寫模擬器倒是可以參考。

由於Ubuntu上的Mednafen套件版本太舊,以下為自行compile & install的步驟:

1.下載mednafen的source code:
https://mednafen.github.io/releases/
此次下載的是 1.22.2版:
https://mednafen.github.io/releases/files/mednafen-1.22.2.tar.xz

2.安裝編譯時需要的工具及函式庫:
sudo apt-get install build-essential pkg-config libasound2-dev libsdl2-dev libsndfile1-dev zlib1g-dev

3.解壓縮並開始compile(建議用gcc)及安裝,譬如解壓縮到 ~/TEMP/mednafen後:
cd ~/TEMP/mednafen
./configure & make
sudo make install

4.下載前端介面mednaffe:
https://github.com/AmatCoder/mednaffe/releases
此次下載的是0.8.8 (注意:mednafen 1.xx開始需配合mednaffe >= 0.8.7使用)

5.解壓縮並開始compile(建議用gcc)及安裝,譬如解壓縮到 ~/TEMP/mednaffe-0.8.8 後:
cd /TEMP/mednaffe-0.8.8
./configure & make
sudo make install

6.啟動mednaffe,第一次可能會詢問mednafen路徑,使用 whereis mednafen 指令查詢後,指向正確執行檔路徑。

7.若要移除,進到原本compile的資料夾,make uninstall即可。

2019-07-07

Linux MInt 19 (Ubuntu 18.04)安裝Retroarch

因為Ubuntu上的Retroarch版本太舊了,想安裝新版Retroarch可照以下步驟:

1.加入RetroArch官方PPA:

穩定版:
sudo add-apt-repository ppa:libretro/stable

nightly build最新版:
sudo add-apt-repository ppa:libretro/testing

因為穩定版跑起來覺得有些問題,個人是安裝每日會自動commit & build的最新版,
目前最新版本的是1.7.7

2.先把舊的RetroArch移除:
sudo apt-get purge retroarch*
rm -rf ~/.config/retroarch

3.安裝新版RetroArch及所有遊戲核心、BIOS:
sudo apt-get install retroarch libretro*

建立存放BIOS的資料夾:
mkdir -p ~/.config/retroarch/system
把下面這一包
http://www.mediafire.com/download/7d5tbargr0iq2x8/RetroArch_BIOS.zip
解壓縮到上面建立的system資料夾

4.修改設定檔:
若直接打開retroarch程式,很有可能選單顯示不正常,且會出現找不到assets的警告,因此必須先手動修改設定檔。基本上有二個設定檔,位於:
~/.config/retroarch/retroarch.cfg
/etc/retroarch.cfg

若找不到~/.config/retroarch/retroarch.cfg,才會找/etc/retroarch.cfg,接著會自動產生~/.config/retroarch/retroarch.cfg,因此主要修改設定~/.config/retroarch/retroarch.cfg即可。Ubuntu 18.04請照以下設定修改(不修改的話,預設(default)會去找~/.config/retroarch下對應的路徑,但因為是用套件管理程式安裝retroarch,所以assets及cores需手動設定成正確路徑):

assets_directory = "/usr/share/libretro/assets/"
audio_filter_dir = "/usr/lib/x86_64-linux-gnu/retroarch/filters/audio/"
libretro_directory = "/usr/lib/x86_64-linux-gnu/libretro/"
libretro_info_path = "/usr/share/libretro/info/"
video_filter_dir = "/usr/lib/x86_64-linux-gnu/retroarch/filters/video/"
menu_show_core_updater = "false" (不經由retroarch升級遊戲cores,而是由ubuntu更新,目前先設為true,第6頻驟建立遊戲清單完再設為false,不過有些遊戲核心如mame似乎ubuntu套件沒有提供,故也可以改用sudo retroarch執行後,再進retroarch去更新核心)
xmb_font = "/usr/share/fonts/opentype/noto/NotoSansCJK-Regular.ttc" (指定中文字型,請依照自已喜好的字體)
system_directory = "~/.config/retroarch/system" (BIOS資料夾)

譬如想找Noto Sans CJK字型的位置,可用以下指令:
fc-match -a | grep CJK
locate NotoSansCJK-Regular.ttc

5.啟動retroarch,若不喜歡預設的XMB介面,可以按F5叫出windos介面做設定或載入遊戲


6.自動建立遊戲清單:
注意:自動建立的遊戲清單裡的遊戲名稱會變英文,不喜歡者請自行手動建立清單。

先在「主選單/連線更新器/更新核心訊息文件」更新各遊戲核心的遊戲資料庫,
再到「導入遊戲內容/掃瞄文件夾」直接掃瞄ROM所在位置,
會自動依各機種對應的遊戲清單,若自動掃瞄沒有找到再自行手動加入,
(由於RetroArch不一定能正確找出ROM所對應的機種遊戲,因此有時需手動加入ROM)
然後在「主選單/連線更新器/playlist thumbnails updater」去自動抓縮圖。


ref:

2019-07-01

linux mint(ubuntu)修改xfce視窗的邊框大小(為了能拖曳改變大小)

因為想換個mac like的佈景主題,於是安裝了McOS-MJV-Dark-XFCE-Edition這個主題:
https://www.gnome-look.org/p/1279806/

但這佈景主題有個缺點,就是右下角跟左下角無法拖拉改變大小,因為邊框厚度為0的話,無法拖曳,原作者說這是xfwm的bug,而且作者覺得增加邊框會不像mac主題(所以要犧牲正常功能??),不過只能從左右上角去拖曳,有時真的很麻煩...只好手動把邊框加回去。

當然,你也可以用熱鍵的方式拖曳大小,譬如 alt + 滑鼠右鍵,但有時就是不想二手一起動...)

1.下載Border Only這個主題:
https://www.xfce-look.org/p/1016214/

2.修改xfwm4內所有bottom*.xpm, left*.xpm, right*.xpm共10個檔案,內容全部改成
/* XPM */
static char * left_active = { <-- 此行依各檔名稱不同保留不改
"1 1 1 1",
"#      c #CECECE", <-- 顏色依個人喜好修改,此處為淺灰色
"#",
};

3.複製上述10個修改過的xpm檔案到佈景主題的xfwm4資料夾內(其餘未修改的檔案用不到),如~/.themes/佈景主題/xfwm4/

4.重新載入主題
xfwm4 --replace

ref:
https://superuser.com/questions/436541/how-do-you-increase-the-resize-border-thickness-in-xubuntu-12-04
http://sevkeifert.blogspot.com/2014/12/increase-window-border-size-in-xubuntu.html
https://wiki.xfce.org/howto/xfwm4_theme
https://xubuntu.org/news/window-resizing-in-xubuntu-and-xfce/

2019-05-08

Linux Mint (Ubuntu) 使用 NUT (Network UPS Tools)


因為舊的台達水瓶座UPS因為沒有Linux上可支援的軟體,因此改採買了一台科風WAR-1000AP(更新:用了二年多同時採購的二台同型號UPS板子都壞了,強列不建議購買),
不過科風的Linux軟體裝上去發現爛得可以(Linux UPSMON PRO),看起來用java7寫的,體積大不說,不但抓不到usb設備,一些test指令下了還會噴錯誤....因此用Linux作業系統的就不建議買科風了,當初是看它有支援Linux才買的,沒想到Linux軟體寫得這麼爛(科風工程師自已都沒先好好測過嗎?),早知就買台達的新型號UPS。

不過買都買了,要是沒法解決就要換貨了,還好看到NUT(Network UPS Tools)的相容列表對科風的支援好像還不錯:
因此就改用NUT來監視UPS,不過不得不說這軟體設定有夠囉嗦的...

2018-03-06

在WINDOWS 10上安裝Kali Linux


Windows 上面可以不用再藉助VM而直接跑Linux了!
藉助Windows Subsystem for Linux(WSL),可以在Windows 10 上跑原生的Linux二進制執行檔(ELF格式),如果Linux上的Wine是用來跑windows程式,那Windows上的WSL也許可以叫做Line(咦?)

  1. 「程式與功能 / 開啟或關閉Windows功能」,啟用「適用於Linux的Windows子系統」,重開機。
    (或直接在有管理員權限的PowerShell裡執行
     Enable-WindowsOptionalFeature -Online -FeatureName Microsoft-Windows-Subsystem-Linux )
  2. 到Mircosoft Store,安裝Kali Linux
  3. 啟動Kali後,先設定使用者為root並設定密碼
  4. sudo apt-get install wget
  5. wget https://kali.sh/xfce4.sh | sudo sh //會安裝非常久...
  6. sudo /etc/init.d/xrdp start //啟動xrdp
  7. sudo /etc/init.d/xrdp stop //停止xrdp
  8. netstat -antup | grep xrdp //檢視是否有啟動xrdp
  9. sudo apt-get install aircrack-ng //安裝蹭網工具 (咦?
再用遠端桌面(RDP)連線localhost:3390

ref:

2016-06-29

在Ubuntu安裝Sublime Text 3及支援中文輸入

1.安裝 sublime text 3

sudo add-apt-repository ppa:webupd8team/sublime-text-3
sudo apt-get update
sudo apt-get install sublime-text-installer

2.建立sublime-imfix.c

2015-12-02

Ubuntu 安裝 SublimeLinter + jshint

在Ubuntu上安裝SublimeLinter + jshint時,nodejs版本要安裝nodejs-legacy版本,

不然Linter會找不到正確路徑。

例如要安裝 jshint 及 csslint:

sudo apt-get install nodejs-legacy
sudo apt-get install npm
sudo npm install -g jshint
sudo npm install -g csslint

Preferences » Package Settings » SublimeLinter » Settings-User 設定 paths:

paths": {
"linux": [
"/usr/local/lib/node_modules/jshint/bin",
"/usr/local/lib/node_modules/csslint/bin",
"/usr/bin/php -l"
],
"osx": [],
"windows": []
}