顯示具有 vscode 標籤的文章。 顯示所有文章

2021-09-11

安裝code-server

 code-server,也就是讓你可以自架雲端版的VS Code(或開源的VSCodium),可以像GitPod(基於Eclipse Theia)一樣用瀏覽器操作遠端vs code介面。

安裝可分三種方式(Linux based):

一、直接下載script安裝(自動安裝deb或rpm):curl -fsSL https://code-server.dev/install.sh | sh

二、手動下載deb或rpm安裝

三、安裝到雲端供應商

安裝上非常簡單,安裝完後,先執行code-server跑跑看,會出現連線網址及port(預設8080),按ctrl+c停止。

打code-server --help會顯示一些可用參數,若不想用參數可修改設定檔,設定檔用的參數名稱與執行命令的參數名稱都是一樣的,設定檔位置在 ~/.config/code-server/config.yaml,以下是範例(埠號10000,使用密碼及憑證):

bind-addr: 0.0.0.0:10000
auth: password
password: mypassword
cert: /path/to/your/fullchain.pem
cert-key: /path/to/your/privkey.pem

若設為 cert: false 會使用自簽憑證,若有正式憑證請把cert及cert-key檔案路徑打上去,
建議憑證一定要設,不然複製貼上等一些功能可能會有問題,免費憑證可以使用letsencrypt,參照cerbot官網並選擇平台照建議安裝即可。

還有一個問題就是預設的plugin maketplace並不是微軟的marketplace,而是open vsx,這是因為使用條款限制的關係而不能直接使用,若想切換成微軟的marketplace,可以新增環境變數,範例script如下(.sh):

#!/bin/bash
SERVICE_URL=https://marketplace.visualstudio.com/_apis/public/gallery ITEM_URL=https://marketplace.visualstudio.com/items CACHE_URL=https://vscode.blob.core.windows.net/gallery/index code-server > /dev/null 2>&1 &  echo "$!"

用以上script執行後會顯示執行的pid並背景執行,想要關閉程式的話,可直接kill -9 <pid>,若沒記下pid而清掉螢幕,就改用 ps -u username Sf | grep code-server 找出/usr/lib/code-server/lib/node /usr/lib/code-server...執行樹最上層的process pid,並用kill -15 <pid>停止程序。

若想用systemd的方式開機自動以某user身份執行的話,可用
sudo systemctl enable --now code-server@username

記得要更換extension marketplace的話,把以下變數設定加到
/lib/systemd/system/code-server@.service
的 [Service] 裡:
Environment=SERVICE_URL=https://marketplace.visualstudio.com/_apis/public/gallery Environment=ITEM_URL=https://marketplace.visualstudio.com/items Environment=CACHE_URL=https://vscode.blob.core.windows.net/gallery/index 

執行code-server加執行參數時,可寫在
~/.local/share/code-server/argv.json 或 ~/.config/code-server/config.yaml
但像要加上 enable-proposed-api 時,寫在config.yam只能指定單個extension,用list形式指定的話無法生效(bug?),只好改寫在 argv.json,譬如:
{"enable-proposed-api": ["genuitecllc.codetogether", "ms-toolsai.jupyter"]}

ref:
https://coder.com/docs/code-server/v3.12.0/collaboration#installing-the-codetogether-extension
https://code.visualstudio.com/api/advanced-topics/using-proposed-api#sharing-extensions-using-the-proposed-api
https://coder.com/docs/code-server/v3.12.0/FAQ#how-can-i-reuse-my-vs-code-configuration

2021-09-09

vscode的鳥bug,跑python預設都只會在powershell跑

在windows上,不管怎麼修改terminal default profile為command prompt(cmd),只要點右上的執行按鈕,就是只會用powershell執行python,而且還無法正常載入conda env環境(還是linux好)。

解決方式:

一、先用管理員進powershell執行 set-executionpolicy remotesigned

二、再到vscode建立python的launch.json,加入如下(參考開始選單中conda呼叫poweshell的捷徑參數修改):

"configurations": [

    {

        "name": "Python: 目前檔案",

        "type": "python",

        "request": "launch",

        "program": "${file}",

        "console": "integratedTerminal",

        "args": [

            "-ExecutionPolicy",

            "ByPass" ,

            "-NoExit",

            "-Command",

            "& 'C:\\Users\\User\\miniconda3\\shell\\condabin\\conda-hook.ps1' ; conda activate 'C:\\Users\\User\\miniconda3' "

        ]

    }

]

 ref:
https://stackoverflow.com/questions/54828713/working-with-anaconda-in-visual-studio-code
https://stackoverflow.com/questions/56450606/how-to-add-anaconda-powershell-to-vscode/61879466#61879466
https://docs.microsoft.com/zh-tw/powershell/scripting/dev-cross-plat/vscode/using-vscode?view=powershell-7.1#workspace-debugging

2019-11-10

安裝 VSCode + Golang 開發環境

1.安裝 golang-go:
sudo add-apt-repository ppa:longsleep/golang-backports
sudo apt-get update
sudo apt-get install golang-go

2.設定環境變數GOPATH
vi ~/.profile
加入:
export GOPATH=$HOME/go
export PATH=$GOPATH/bin:$PATH
再執行:
source ~/.profile

3.建立 ~/go 資料夾,也就是剛剛設定的GOPATH路徑

4. VSCode安裝vscode-go套件:
https://marketplace.visualstudio.com/items?itemName=ms-vscode.Go

按F1或 ctrl+ shift +p,執行 Go:install/update Tools,打勾所有工具並安裝

5.建立個專案資料夾,如~/go/src/hello,並在資料夾內寫一個hello.go,
並在terminal執行:
go build
./hello
或直接執行go run hello.go
看能不能正常執行

ref:
https://github.com/golang/go/wiki/Ubuntu
https://marketplace.visualstudio.com/items?itemName=ms-vscode.Go
https://github.com/Microsoft/vscode-go/wiki

2019-07-11

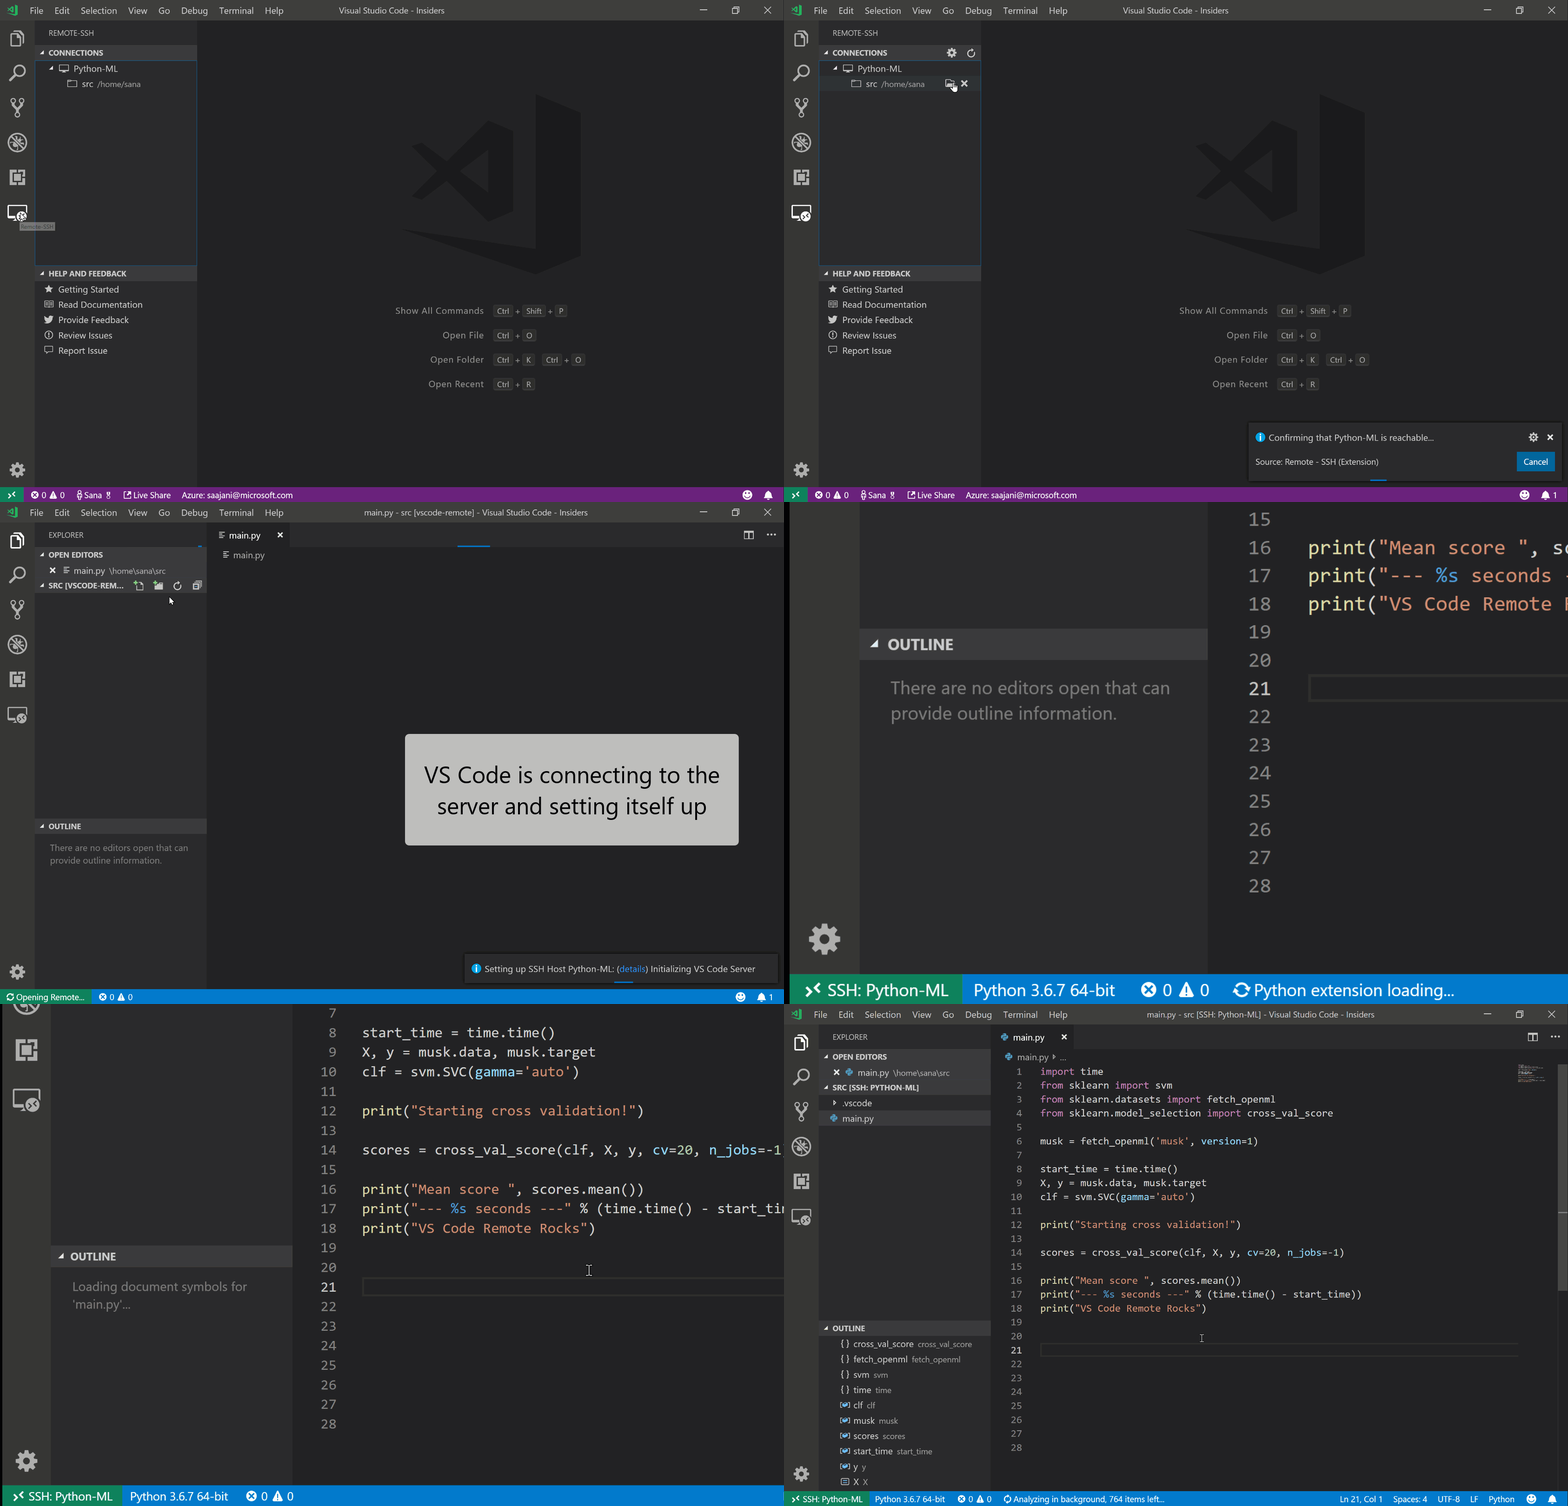
Visual Studio Code使用Remote-SSH套件遠端作業

由於常常需要ssh連到server修改檔案,之前是使用VSCode的remote workspace套件:
https://marketplace.visualstudio.com/items?itemName=mkloubert.vscode-remote-workspace

後來微軟又出了個Remote Development套件,裡面包含了:

  • Remote - SSH - Work with source code in any location by opening folders on a remote machine/VM using SSH. Supports connecting to x86_64 Linux SSH servers now, and more platforms are on the way.
  • Remote - Containers - Work with a sandboxed toolchain or container based application by opening any folder inside (or mounted into) a container.
  • Remote - WSL - Get a Linux-powered development experience from the comfort of Windows by opening any folder in the Windows Subsystem for Linux.
如果只有SSH遠端作業的需求,只要單獨安裝Remote - SSH即可:

目前該套件能正常連線遠端server有以下作業系統:
Full support: x86_64 Debian 8+, Ubuntu 16.04+, CentOS / RHEL 7+.
Experimental support: ARMv7l Raspbian 8+ (32-bit) in Visual Studio Code Insiders only.

果然我找了台CentOS 6就無法連線成功了...但其實如果你堅持要能在版本比較舊的server端使用,可以參照以下說明,在server端安裝缺少的一些library:
https://code.visualstudio.com/docs/remote/linux#_tips-by-linux-distribution

像CentOS 6可以照以下方法讓Remote-SSH套件能使用,安裝完重開機即可(注意,因為是升級library,可能會造成server某些服務不正常,如果是跑重要服務的server要升級library前請三思):
https://code.visualstudio.com/docs/remote/linux#_updating-glibc-and-libstdc-on-rhel-centos-6

不過遠端server要先做一些設定,修改 /etc/ssh/sshd_config,將 AllowTcpForwarding設定為yes,然後記得restart ssh demon:
sudo systemctl restart sshd

sudo service sshd restart
這樣本機端才能對server端建立 SSH tunnel,因為Remote - SSH必須靠建立tunnel才能使用(有點雷...)。

還有幾個設定比較需要注意的:

"remote.SSH.useLocalServer": true/false -> 讓vscode視窗共用單一連線,這會讓開啟vscode更快且不用一直輸入密碼,但有時候會造成無法正常連線(譬如timeout),此時設為false試試。一般來說我是設為false,但有些人須設為true才會沒問題。

"remote.SSH.listenOnSocket":true/false -> 如果remote server上有很多使用者的話(MacOS/Linux),那麼讓遠端的vscode server改用socket模式監聽,這樣可以增加安全性,同時sshd的AllowStreamLocalForwarding設定也要設為yes,這樣才能把tcp給forward到socket上。

接下來就是安裝Remote - SSH套件,連線ssh的方式較常見有key based authentication,或輸入password的方式、還有就是同時key+password,個人是習慣每次連線只輸入密碼,
至於網路一些教學說只能用key的方式,我覺得這些人也是東抄西抄不求甚解,這套件是基於ssh使用的,當然是可以直接輸入密碼認證。

先修改本機 ~/.ssh/config 檔案,加入以下設定:
Host server1
    HostName server1.com.tw
    User username

Host server2
    HostName server2.com.tw
    User username

#避免要多次輸入密碼,加入以下ControlMaster設定
Host *
    ControlMaster auto
    ControlPath  ~/.ssh/sockets/%r@%h-%p
    ControlPersist  24h

#防止timeout,每120秒就向server發送keep-alive封包,超過60次無回應斷線
ServerAliveInterval 120
ServerAliveCountMax 60


建立 ~/.ssh/sockets 資料夾:
mkdir -p ~/.ssh/sockets

之後就可以開始連線了,連線過程中會出現prompt要你輸入密碼,完成。


2018-07-17

python在virtual environment (venv) 環境時,vscode pylint會報import ... not found

在python的virtual environment工作時,vscode的pylint會說找不到套件,
因此我們要vscode的「Folder Settings」去指定 venv 下的pylint路徑,而不是global的pylint,
順便把python路徑也一起修改:

(Windows)
"python.pythonPath": "${workspaceFolder}/Scripts/python.exe"
"python.linting.pylintPath": "${workspaceFolder}/Scripts/pylint.exe"

(Linux)
"python.pythonPath": "${workspaceFolder}/bin/python"
"python.linting.pylintPath": "${workspaceFolder}/bin/pylint"


因外由於 pylint 對 python 3.7的支援性不太好(沒事就在噴runtime error錯誤),
我們可以安裝 preview version的pylint來解決:

pip install pylint astroid --pre -U

或改用flake8也行:
pip install flake8

用flake8記得修改vscode設定:
"python.linting.flake8Enabled": true
"python.linting.pylintEnabled": false
"files.trimTrailingWhitespace": true